Okay?
Before this past weekend I had never made my own buttercream frosting. There I've said it. Actually I didn't think it was that big of a deal until more than a couple of people were shocked by this on Saturday night when I admitted to making some for Maya's birthday cake. Usually I use Duncan Hines or the stuff from the Bulk Barn if I'm decorating since Duncan Hines doesn't crust up. But that was before I got my beautiful new mixer that Michael spent his Survivor Pool winnings on.
Remember the cake I made last year for Abby's birthday? When I did the icing transfer that I wasn't entirely happy with? Well I was planning on using that technique again, but with Royal icing. I thought it would make the transfer a lot more forgiving when it came to placing it on the cake. I broke Ariel in half last time trying to position it on Abby's cake. So I whipped up a bunch of royal icing and set to work.
I had intended to make this a tutorial for this installment for WCW because I think it's a wonderful and cheap alternative to grocery store cakes. Personally I loathe grocery store cakes. Then I got distracted by actually finishing the project and forgot to keep taking pictures of the steps. Here's what I did get though.

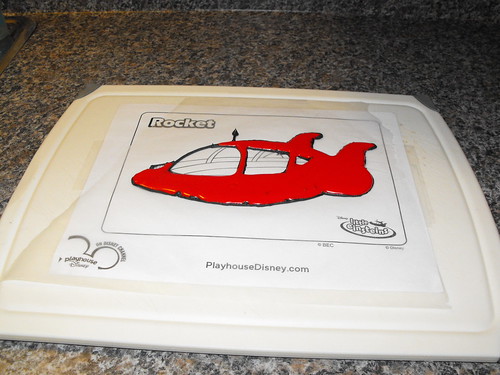
First you need to find yourself a stencil. You can draw it or use a colouring book or something along those lines. The stencil I used is a colouring printout from the Little Einstein's set at Playhouse Disney. You want to look for a stencil that is pretty simple. Especially if it's your first time. The less detail the better. Tape the stencil to a cookie sheet or a cutting board or any solid surface that will easily fit in your freezer. Over top of your stencil tape a piece of waxed paper so the entire stencil is covered.

Using a crusting icing (like buttercream, recipe to follow) mix a small amount (enough to do the entire outline) with black food colouring. Fill your piping bag and using your writing tip (#2?) outline your design on the waxed paper. If you'd like you can let this "set" for a few minutes while you get your next colour(s) ready. Now in this case I was only using a couple of colours, mostly red. So I mixed up the red and filled in between the black lines. Remember you're working backwards so colour in your pieces in a way they need to make sense on the reverse side. Finish "colouring" your piece however you'd like and then pop it in the freezer to freeze for a couple of hours or so. With royal icing you can let the pieces air dry. I left mine to dry overnight.
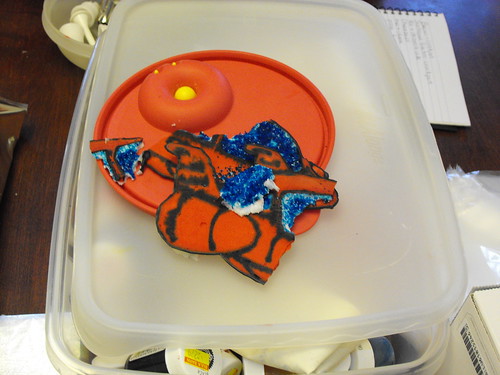
Here's where I'll break in and tell you about my first attempt. The royal icing as great for making a rigid piece that held up to handling while I positioned it on the cake. And once I had it on the cake I hated it. For some strange reason the black outlines bled into the red. So instead of have nice clean lines, they were fuzzy. Very fuzzy. Having never used royal icing before I couldn't tell you what the issue was. What I do know is it looked like poo, despite what Granny and Mike tried to convince me of.
I still had buttercream icing left and I knew I could have a new buttercream icing transfer in the freezer in no time. My Mom tried to convince me to leave it, but the longer I stared at it the more I hated it. so I decided to pull it off and start from scratch. Mom suggested I save that one in case I needed to use it in the end, but it broke into pieces during the removal process.

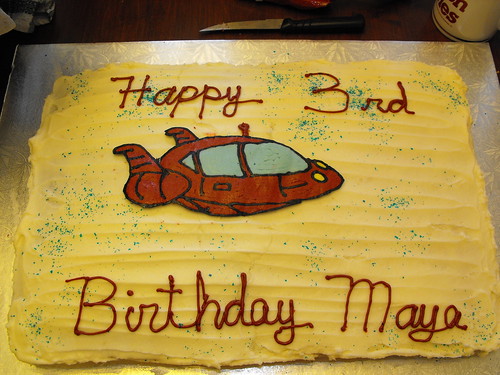
See I told you, fuzzy lines. So in less than an hour I had a new Rocket tucked away in the freezer. With buttercream, because it doesn't dry as rigidly as royal icing you need to freeze it so you can it will stnad up to the transfer process. Basically just put it on your cake, waxed paper side up, and peel the paper off. Just go slowly and be gentle, your piece will be a little fragile.
What I love about this method is the transfer part can be made in advance and stored in the freezer until you need it. Also it allows the kids to have the cool character birthday cakes without my having to pay huge bucks for grocery store birthday cakes that I don't like. Or put out a bunch of money on Wilton character pans that I will use for one year and then stick in the closet. Plus I never would have found a Rocket cake pan and he's pretty much the reason she gets up every morning.
And now the recipe for the buttercream icing I used.

Vanilla Buttercream Frosting
3 cups powered sugar
1/3 cup butter, softened
1 1/2 tsp vanilla
1 - 2 tbsp milk
Mix powered sugar and butter in a medium bowl with a spoon or electric mixer on low speed. Stir in vanilla and 1 tbsp of the milk.
Gradually beat in just enough of the remaining milk to make the frosting smooth and spreadable. If the frosting is too thick, beat in more milk, a few drops at a time. If frosting becomes too thin, beat in a small amount of the powdered sugar. Frosts a 9 x 13 inch cake or an 8 or 9 inch two-layer cake.
Recipe Notes: This frosting turned out very well for my first attempt. Just remember to use clear vamilla or your icing will have a slight tint to it, which mine did, but after all the other stuff I didn't really care.
What is What's Cooking Wednesday and how can I play?
What's cooking Wednesday was born out of a desire to get out of that what's for dinner rut. Playing is easy, on Wednesday post a recipe that has been tried and tested by you and then pop over here and add your name to the Mr. Linky. When entering your name also add the name of the recipe in brackets and make sure you link to your What's Cooking Wednesday post and not just your blog's front page. And don't forget to link back here, the home of What's Cooking Wednesday.
So for example I would write Shan (Speedy Chicken Stir Fry) in the name section. For the URL section I would post this: http://shanrev.blogspot.com/2007/10/whats-cooking-wednesday-speedy-chicken.html
I'll let you in on a little secret. Much to Kaffy's chagrin, my WCW recipes are almost never made on a Wednesday. So feel free to cook and photograph whenever you have time and join us posting on Wednesday.

11 comments:
Way to go! I love your cakes. They're always so creative and look great.
I love making my own buttercream too. Now that you've done it you'll never go back. I keep clear vanilla on hand just for the icing. I get it at Bulk Barn.
Wow - that looks super impressive :) :)
That does look amazing -- I will try it. Some questions:
* how did you get such a true red colour? When I use red food colouring, it just turns pinkish. Also, where do you get black and grey food colouring?
* Have you ever tried this with store-bought icing in a tub? Does it work as well?
That's such a great idea! I might try that for my son's 4th birthday next month...Star Wars Theme!
That is so cool. My sister and I love to make cakes. I had never thought of your idea but I LOVE it. I will use this technique for sure.
I love that idea, but have yet to try it. Can't wait to do so at some point, though!!!
I copied this one. I don't know if would be as skilled at the picture thing, but it is nice to have an iceing recipe.
Smiles
Wow!! It's too bad I don't live closer...I'd get you to make my kids' birthday cakes :)
Karen - Thanks. And you're right it's homemade icing all the way from now on. You should give it a try. Your Dora cake looked awesome and this is way easier.
City Girl - thanks!
Lynn - To get that true red I used Wilton gel food colourings and I used a lot of it. I get all my colours at the Bulk Barn, but I'm sure they would have them at Michael's too. As for the icing, if you're talking Betty Crocker or Duncan Hines, then no it won't work. It needs to be a "crusting" icing. One that dries to a "hard" finish. The canned ones at the grocery store stay soft. The recipe I listed here is super easy or you can, like I used to, buy a "crusting" icing in bulk at the Bulk Barn. The only reason I stopped is because whenever I went down there I spent way too much money. It had to be cheaper buying butter and icing sugar. Feel free to drop me an email if you have any other questions. And let me know if you do one. I'd love to see it.
Cristan - Can't wait to see yours.
Chantal - Thanks, have fun with it.
Leah - you should. Your pirate cake was awesome.
Angela - yes I've come to find a good icing recipe is a must have.
Jill - aww that is so sweet of you to say.
Lynn, I know this is Fairy Blogmother's Blog, but please put any questions on here. You have good questions and I want to know the answers!! ;->
FBM - This is great. I might just attempt this in March. Never say never!
Hi, Great cake! What would happen if you did a logo or writing? Would it turn out backwards when you transferred it on a cake? I've also read that once you are done outlining your picture in icing, you then cover over the entire thing with the extra icing you have left- won't this cause some colours to change or bleed into the original picture?
Thank you
Post a Comment